


By James A Duke
Learning how to start a beehive is a rewarding experience that gives to your homestead year after year. When I got my first beehive, I had a basic understanding of bees, but I was inexperienced and far from where I needed to be. There’s a lot to learn about raising honey bees. I read books and papers in school, but I didn’t learn how to start a beehive until my bees arrived. Several months after getting my first hive we joined our local beekeeper’s association and had a more experienced beekeeper mentor me for a few months.
How to Start a Beehive
This Beekeeping 101 article will walk you through the process of starting your first beehive – from gathering your equipment and installing your bees to extracting honey. The first part of the article we will focus on how to start a beehive, determining the best type of honey bee for your hive, gathering the right tools and equipment, and finding bee and beekeeping equipment suppliers. These tips are applicable for anyone starting a beehive even if it’s a backyard beehive in the city.
What Kind of Bees Should You Get?
There are many types of bees available for beekeepers. They range from gentle bees to not-so-friendly bees. Each bee breed has its ups and down whether it’s keeping pests at bay or overwintering well or having high productivity. Here are a few examples:
- Italian bees are the calmest breed of honey bee with great productivity.
- Buckfast bees are a bit more aggressive with good productivity.
- Russian bees are similar to Italian bees (as far as their temperament) but they can withstand winter conditions better than all other bees.
- Africanized honey bees have really good honey and brood production but their temperament is so bad that they will attack anything within one hundred yards of the hive (and even further than that). I would recommend staying away from the Africanized bees as they are an extremely aggressive breed.
You can purchase bees from various suppliers, but we have used: Long Lane Honey Bee Farms, R. Weaver Apiaries, and B Weaver Apiary. These companies sell very good and healthy bees.
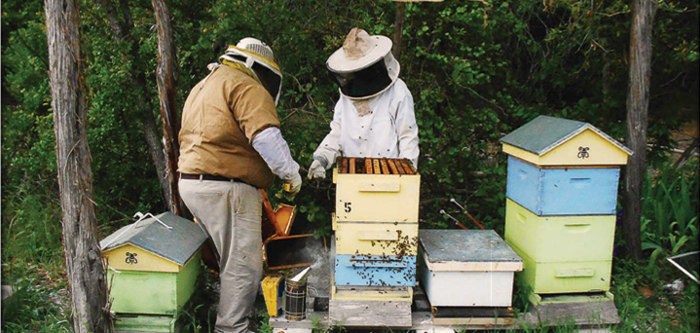
Beehive and Beekeeping Equipment
There is basic equipment that beekeepers can use. I would recommend each of these items for new (or even for experienced) beekeepers. Your equipment should include:
Bee suit
The suit is the most important tool you have as it protects you from the bees. Make sure it is a size or two larger than your normal clothes size to help keep it loose. If it is too form fitting, the bees will be able to sting you more easily. They typically come in white but some companies provide the suits in different colors. I would suggest white as bees do not like dark colors (including red or black).
Beekeeping Gloves
The gloves are optional but I highly recommend them because they do save your hands from getting stung. They come in different forms: cowhide, sheepskin, rubber, and rubber coated. Cowhide gloves are the best in my opinion. When I was handling killer bees I didn’t get stung through the cowhide gloves at all, although rubber gloves are easy to clean and easier to grasp things.
Bee Smoker
A smoker makes smoke to calm down your bees. The smoke does not hurt the bees but encourages them to eat their honey which calms them down.
Bee Hive
Holds the bees, honey, and brood
Boots
Helps protect your feet (rubber boots are great to use as the bees cannot sting through them and you can tuck your pants into them to help the bees from climbing up your pant leg).
Bee Hive tool
Helps pry apart the boxes and loosen the frames, which makes it easier when checking the hives.
Frame lift
Helps lift the frames out of the hive with ease. Sometimes gloves can become cumbersome, especially when trying to lift the frames out of the boxes. The frames can weigh up to 10 pounds when full of comb, beeswax, and bees. The frame lift really helps to get a good grip on a frame.
Frame holder
The holder hooks onto the side of the hive and serves as a place to hang the frames (instead of placing them on the ground) while searching for a queen or inspecting the hive.
You can purchase supplies and equipment from these companies: Dadant, and Mann Lake.
Components of Your Beehive
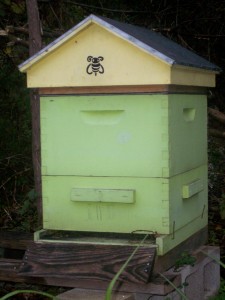
The components of the hive from top to bottom are listed below. These are what a basic hive should have and what’s needed to start a bee hive. Each has its own job:
- The top cover protects the top of the hive from the elements.
- The inner cover is an extra protective barrier.
- The super is a smaller version of a deep (I will get to that in a minute). It is where the bees store the honey, although you can use a deep box for honey it weighs about a hundred pounds.
- The queen excluder is a smaller screen that keeps the queen in the deep on the bottom of the hive so that she cannot get to the honey stores and lay eggs in and amongst the honey. You don’t want brood (baby bees) in the honey.
- The deep box is used on the bottom of the hive for the queen to lay her eggs. This is also where the entire hive stays during the cold days of winter. As I mentioned before, the deep can be used for honey. However, make sure that you have a person that can lift the boxes if you decide to use them for honey as they can weigh around 100 pounds when full of honey, wax, and bees.
So, that wraps up the first portion of this beekeeping 101 guide. I had a bunch of fun explaining how to start a beehive. Each of these steps is important when learning how to start beekeeping. In the next section I will explain how to install a package of bees.
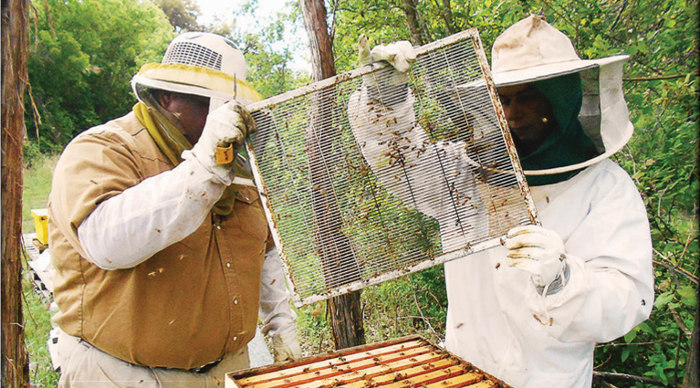
Installing Package Bees
I remember when I got the call that my first package of bees was at the post office. I was frightened and very excited at the same time. When we picked up the bees, the lady behind the desk handed the package to me like it was a nuclear bomb ready to go off at any second. The question is, when your bees arrive, what do you do? In this section of how to start beekeeping we’re going to focus on how to install the bees, how to light the smoker and what to look for in the hive.
Installing Your Bees
Before you leave the post office with your bees, inspect the package first. If there are a whole bunch of dead bees on the bottom of the box, do not accept them. Send them back to the supplier and ask for another box of bees.
Once you are home with the bees, make sugar water. Combine 8 cups water and 8 cups sugar in a large pot. Let it boil on the stove top. Once the liquid is clear, turn the stove off and let it cool. Pour some into a spray bottle. Pour the rest into mason jars (you’ll use this sugar water to feed the bees).
- Take your bees down to the hive and spray them with the sugar water you made (which calms them down and gets their attention off of you).
- Remove four frames from the center of the hive.
- Take the lid off the bee container and remove the can of sugar water and the queen cage from the package.
- Spray the bees again lightly and shake the bees to the bottom of the box.
- Turn it upside down and dump them into the hive where the four frames were removed. Repeat this step until 99 percent of the bees are out of the container.
- Put the four frames back into the hive and place the queen cage in between two of the four frames.
- Place the bee package next to the hive. Any remaining bees will find their way into the hive at this point.
- Leave the queen in the cage for a week. During this time the bees become accustomed to her pheromone and will usually accept her as their queen. If you remove her from the cage too soon you run the risk of them attacking and killing her. After a week release her but do not linger in the hive once you do so. Make sure she gets on one of the frames then close everything up and leave.
One week after you release her, you will need to do a routine check on the hive to see if the queen is alive and healthy (see the Inspection of the Hive section below).
Your journey has begun now that your first hive was successfully installed. You will need to check on the hive once every week or two. This will help you understand your bees and how they act (what is their normal behavior).
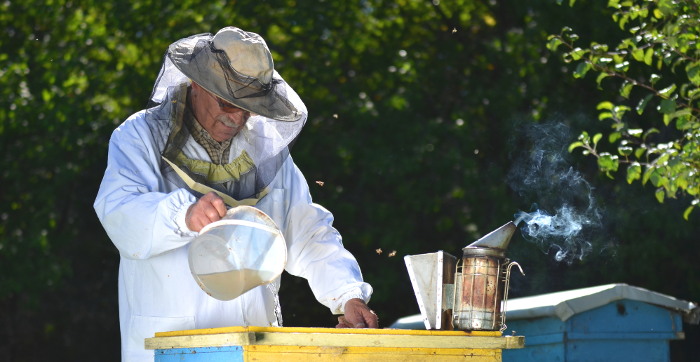
How to Use a Bee Smoker
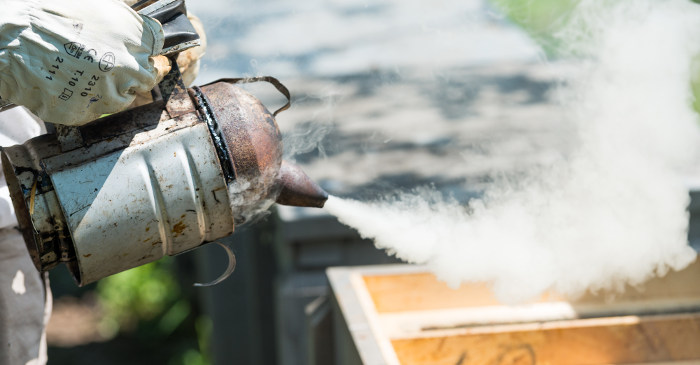
Do not use any fuel that makes hot smoke, like cedar needles, otherwise it makes the bees really mad. Use cool smoke, from green grass or oak leaves, so that it calms them.
- Open the smoker.
- Put dry grass on the bottom and then add some green grass on top.
- Light the smoker and give it a few gentle puffs.
- If the smoke dies add more fuel.
Once the smoker has billows of smoke coming out then you are ready to go. Every now and then add more fuel if need be while you are at your hive.
Honey Bee Hive Inspection
Here is what you must look for in the hive when you go and preform your first beehive inspection.
First, is there a queen? If you can’t find her, look for eggs in the cells, they look like small grains of white rice. If you find eggs then you are in great shape. If not, then you will need to search for the queen and see if she is even alive. If you cannot find her and you do not see eggs, then you will need to order a new queen.
Second, are they making wax? Are they building out the frames with wax?
Third, are the bees still healthy?
Fourth, are the bees eating the sugar water? You may need to refresh their sugar water if it is empty. Plan on taking some to your hive just in case. Remember, the more you feed them the more wax they build.
Now that you have installed your first hive, you are on your way! I hope you have a great time as we go through the world of bees and beekeeping. This journey will take you over hills and valleys but you will overcome these situations and learn how to deal with them as they happen.
Beehive Honey Production
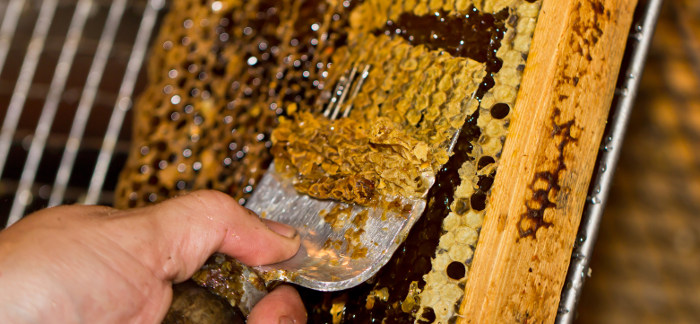
During the summer your bees will be in the prime of the honey season. They will be bringing in nectar and pollen from all of your local flowers, trees, and bushes. Expect them to be filling your boxes with light honey and maybe even some dark honey. This is very good because they will need this honey for over-wintering.
To make honey, the bees gather the nectar from the flowers and trees. When they get back to the hive they give all of that nectar to the worker bees to make the honey. They in turn mix the nectar with water and their saliva with their proboscis. They continue this process until the water content and the moisture content is just right. At this point they cover the cell with the honey in it with a wax capping to make sure it doesn’t get any more water in it or anything foreign.
Feed your bees through the summer since the heat will make it hard on them. The sugar water will give them the energy to fan the hive to cool it down. If you were not able to put the hives near a water source (like a pond or creek), then at least fill a shallow pail or bird bath with water. You will also need to place rocks or something similar in the water for the bees to land safely without drowning. Making sure that your bees have water is the most important thing you must do in the summer.
Beehive Nectar Flow
The nectar flow is the most exciting season for you and your bees. This is when they start to produce honey. As I mentioned earlier, it is during this time they will be curing the honey and making sure the moisture content is just right before sealing it with wax. Do not take any honey in your first year because this is meant for them during the winter. Next year you can harvest honey; this is beekeeping rule number two. Now your bees might get a little defensive over their honey and may be a little more aggressive when you do hive inspections. Do not panic, just smoke them thoroughly. My bees get that way. It comes with the territory.
Collecting Bee Pollen
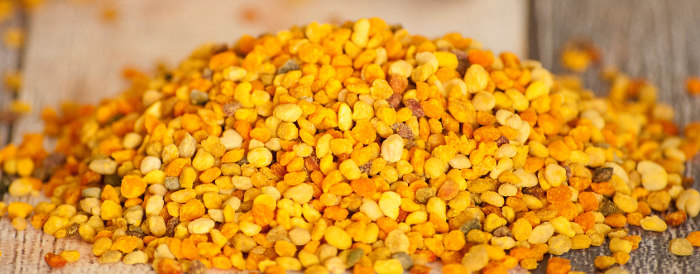
If you have a pollen trap this is going to be a good time for you because your bees should be collecting pollen like crazy. Hopefully you have lots of flowers and trees blooming in your area. Just like honey, local pollen will help you fight allergies plus it contains eighteen vitamins and twenty-eight minerals. We take it as our multi-vitamin, too. There are many benefits of pollen.
Just as with flowers, bee pollen comes in many different colors. It tastes just like honey and some people I know equate it to the taste of flowers. When you get your pollen make sure that you freeze it, because pollen is wet when you get it and will get moldy if you have it out too long. But, you can also dehydrate the pollen and make it shelf stable.
Honey and pollen are great natural sources for fighting allergies and colds. However, it’s not a “cure all.” You may still get sick once in awhile. I take honey and pollen every day just because I like the taste and it helps with my allergies.
Hopefully, you haven’t had problems with a drought like I have had to deal with for the last four years. If you are experiencing a drought, then it’s especially important to have a fresh water source for your bees. I hope that you have a good start to beekeeping and find it fun.
Honey and other Bee Products from the Hive
There are tons of good products you can get from a bee hive, depending on what interests you. You can use the bees’ wax, propolis, pollen, honey, and even the venom.
Bee Pollen
Pollen, also called bee bread, contains over eighteen vitamins and twenty four minerals and is as helpful with fighting allergies as honey. If you purchase pollen produced in your local area.
Bee Honey
Honey is nature’s natural sweetener that bees make from a mixture of their spit, nectar, and pollen. We often take honey for granted and we never really fully appreciate where it comes from. That is one reason I keep bees—for the honey— but also to make sure the bees are recognized for their amazing gifts.
Bee Venom
Now I want to warn you that dealing with venom can be very dangerous, especially if you turn it into a powder and breathe it in by accident. It will close your lungs and make you suffocate. Venom is typically handled by hospitals and pharmaceutical companies as they know what to do with it. I would leave it to them. However, some people let bees sting them on their hands to help with their arthritis.
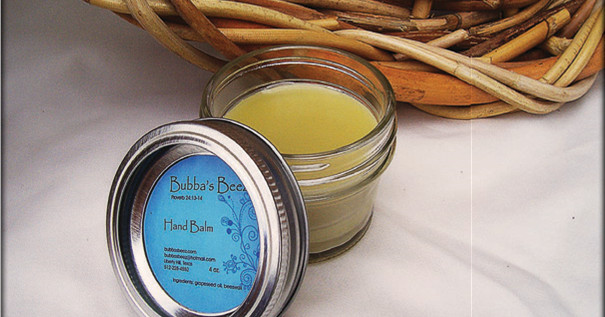
Beeswax
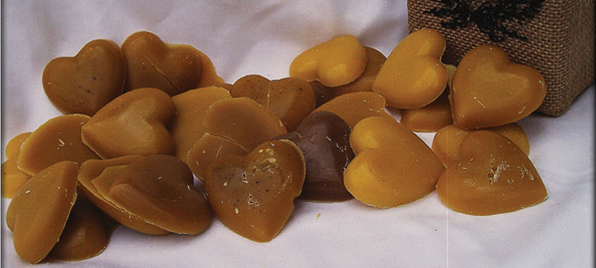
Beeswax has been used for thousands of years as a wood sealer. During World War II, we used beeswax to coat the artillery shells from the rain and snow. During this time several millions pounds of beeswax were used. There are so many other ways you use beeswax, such as:
- Couch and leather polish
- Candles
- Soap
- Hand balm and lip balm
- Wood finish
- Ear candles for removing excess earwax
- Lubrication for wooden drawers to make them slide easier
Propolis
Propolis is the hive’s super glue that holds the hive together. Propolis may have health benefits for us humans. You can make a tincture for wounds out of it. My mom makes a propolis tincture or infusion with Everclear and pure propolis straight from the hive. We use it for our cuts and scrapes, and she has even used it on her sore throat instead of a cough syrup. This is how she prepares it:
Propolis Tincture or Infusion
Clean the large pieces of hive debris from the propolis. Place the clean propolis in a mason jar and fill the jar with Everclear (should be a 2:1 ratio, Everclear to propolis.) Cover tightly with a lid and ring and shake the jar to mix it together. Let the solution sit in a dark corner or cabinet for 3–4 months. During that time, shake the jar every few weeks. The Everclear will turn brown and the propolis will begin to break down.
When the propolis has fully broken down, carefully strain the liquid without disturbing the propolis on the bottom (so that you have a clean solution). You can use a medicine syringe to do this or some other method of siphoning. Try to leave as much of the sediment in the bottom of the jar as possible. Store the tincture in dark bottles and label accordingly. Shake before using.
Beehive Theft Prevention

One evening last month I realized that the honey from our hive in the local community garden had been stolen. Although it was locked, the thieves got in through the side of the enclosure by cutting the fence. Beehive theft is a serious problem and I never would want anyone to go through that … ever. A few nights later we went back and—under cover of darkness—took my hive and hive equipment and moved them back to my house. With that in mind, this chapter will cover bee hive theft prevention, protection and security details.
Some of the most unexpected places are the best areas for theft. I had my hives in a community garden that we considered to be relatively safe. They were in a chicken coop enclosure with chicken wire and tin surrounding the outside with a padlock on the door. The hive still had honey taken from it. A church’s hives down the road from my hives had their honey stolen a few years ago. Another young teenage beekeeper in the next town had eight hives stolen from his property. I don’t know exactly where he lives, but it took more than one person to steal those hives because hives are heavy. It requires two people to lift a hive (which can be 50–100 pounds per box).
If you keep your hives in a public area, I would strongly suggest you get the best hive enclosure possible. We thought the one with the padlock and completely enclosed with chicken wire would be secure, but it wasn’t. You may need to consider a stronger enclosure. I would also suggest using a big, strong lock. You may also want to consider a camera setup to watch the hive at all times (like a game camera) so you can see who comes near your hives. It can also serve as evidence, if necessary.
Beehive Branding and GPS Beehive Tracking
Another option a few beekeepers in our area are using is GPS tracking chips inside their hives. Many people do not consider putting tracking chips in or on their hives. I was one of those people, but I have learned a very valuable lesson that no matter how much those chips cost, it is an investment for you and your hives. Having hives stolen is not just a problem in this small community where I live. It is also seen on a commercial scale.
I read an article recently about an 18-wheeler of hives that was stolen. Commercial beekeepers are now putting brands on their hive boxes as a way of telling which hives are theirs. Branding your hives is very popular and they help keep track of where your hives are and if someone does steal your hives, you can easily find them. If you can find the hives the person might deny stealing them, but with a brand or the beehive GPS tracker there is no denying that they are yours.
How to Make Weak Bee Hives Stronger
Every beekeeper has one or two weak hives. It is just that simple. I’ve had them, my mentor has had them, and eventually you will too if you don’t already. I’ve been mentored by one of the best, and he has shown me how to make my weak hives just as strong as, or even stronger than, my best hives. If you have a weak hive, this information just may give it the chance it deserves to survive.
First of all, we need to establish a rule of thumb on how to look for a weak hive. The signs are very clear and extremely easy to spot even for a beginner:
Signs of a Weak Beehive
- Very spotty brood in the frames
- Very little honey
- Very little wax on just a few frames
- The hive is barely active
- Tons of beetles, wax moths, and other pests in the hive
- The bees aren’t aggressive towards robbing hives or wasps
- They haven’t progressed over a period of a few weeks
To make hives stronger you can feed the hive more sugar water and/or give them pollen patties, combine a weak hive with a stronger hive, or replace the queen.
Combining Bee Hives
Learning how to combine beehives is extremely simple. The only equipment you need is newspaper and then follow these steps.
- Pick your strongest hive.
- Kill your weak queen.
- Remove the lids from your strong hive.
- Lay no more than two layers of newspaper over the open box of your strong hive.
- Add the box of bees from your weak hive on top of the newspaper on your strong hive.
- Put the lids back on the newly combined hive and leave them alone.
- Check the hive in a few days to make sure they are doing okay and getting along.
This method is used if you don’t want to buy a new queen and you want to save the rest of your bees. The newspaper allows the bees to get used to each other and it also prevents them from killing each other at the same time. As they chew through the layers of newspaper they become familiar with each other and join together. The paper they eat gets thrown outside of the hive.
How to Replace a Honey Bee Queen
Replacing a honey bee queen is also simple.
- Order a queen from your supplier. A day before your queen arrives, kill the current queen in your weak hive. This allows your bees to recognize that they don’t have a queen.
- Once your queen arrives, remove the plug / cork from the queen cage (on the side where the candy is located). But, do not remove the candy! The bees will eat through this candy barrier to release the queen. If you remove it she will either fly away, or be killed by the bees since they are not used to her pheromone yet.
- Install the new queen in your weak hive. To do this, place the queen cage in an area where there are a lot of bees, preferably between the middle frames. Make sure you pinch the sides of the queen cage between the frames so that the mesh side of the queen cage faces one of the walls of the hive (not towards one of the frames).
- Close the hive and come back four days later and see if they let the queen out.
- If the bees have not released the queen at this point, watch them for a little bit to see if they are acting aggressively towards her. If so, leave her for another two or three days. If they are not being aggressive towards her, release her manually by removing the black mesh on the queen cage or the other plug (the one that doesn’t have the candy).
These steps for making hives stronger are simple and need very little work. I used to think these steps were extremely hard, but I was a beginner. Now I am explaining them to you so that they won’t be hard for you. Once you master these steps all other steps that you may take in the bee world will become easier.
How to Split a Beehive
Splitting a beehive is one of the most important ways to expand your bee hive count. I learned to split my hives and get three to four hives from one strong hive. I know what I just said sounds crazy, but it is the truth. I was awed by the experience, and I look forward to having at least twenty hives by the end of next fall. I will walk through this chapter in great detail and try to keep it easy for everyone to understand.
Tools for Beehive Splitting
- Extra empty deep boxes with ten frames or eight frames if you have an 8-frame hive
- Extra beehive box bottoms
- Extra beehive box top covers and inner covers
- Queen Bee(s)
Instructions for Splitting a Bee Hive
These steps are for those who want to rapidly grow their hive count or for those who just want one more hive with the least amount of expense. I had the idea that you had to buy more bees to get more hives—but not with this method of splitting! It is the most cost-efficient way of expanding your apiary especially if you buy used equipment like I do.
- Open one hive at a time. This saves pain and frustration.
- Go into the queen’s box and pull out three frames of brood and shake them off so that the queen falls back into the hive.
- Add the three frames of brood that you just removed from the original hive into the empty deep box.
- Go back into the original hive and pull out two frames of honey and add these into the box with the three frames of brood.
- In the original hive, place a queen excluder between the queen’s box and the box full of brood and honey.
- Add the new box with the five frames of brood and honey on top of the queen excluder. You should now have a new box with brood and honey sitting on the original hive.
- Put the lid back on and wait until dark to go back to the hive.
- Once it’s dark, remove the new box (with the inner cover and lid) from off of the queen’s box and put the box on a new hive bottom. Place a new queen (in her cage) in the new hive.
- Add an inner cover and telescoping cover to the original hive. You now have two separate hives.
- Be sure to feed both hives with sugar water (and any other hives you are splitting.)
- After four days, open up the new hives to see if the queen has been released. If she has been released, see if you can find her. If she has not been released, release her yourself and watch her go into the hive.
- In one week, check the new hives again to see if the queen is still alive and if she is laying eggs.
- Continue to check the queen(s) weekly until you are sure that she is established and doing well.
If your queen dies or is not laying eggs very well, order a replacement queen as soon as possible. Only do this if your queen is not laying after a week or so of having sugar water. You want to give your new queen a chance to start laying more productively, especially after her long journey in the post office truck to your home. If you are going to replace her, simply crush the nonproductive queen with your fingers a day before the new queen arrives. This gives the bees a chance to realize that they don’t have a queen. It is that simple.
Winterizing Bee Hives
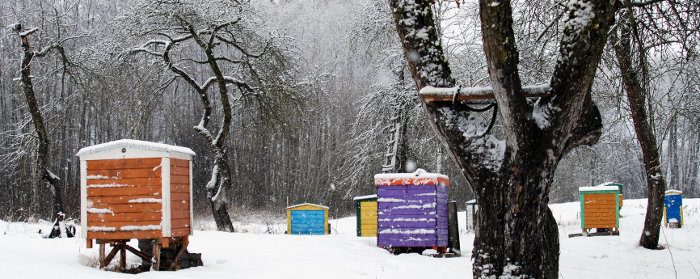
Wintering bees during the cold months can be very nerve-racking because you don’t know if your bees will live or die. The cold can be very harsh on your little winged ladies; the stronger the hive, the better off you are. Since I live here in Texas, our winters don’t get too cold that often, but this last winter I had to take some precautions to make sure they lived through the winter. The steps are easy and should be relatively inexpensive.
As winter starts you are going to want to feed your bees a two-to-one ratio of sugar water or just add an extra pollen patty if you use those. They should also have enough honey from spring, summer, and fall to survive on if they run out of sugar water and pollen patties. For those of you who live in areas that get very cold you will also want to take these wintering hive precautions:
- Make sure your bees have enough food to eat during the winter.
- Wrap your hives in tar paper and make sure that they have a small gap at the entrance to get out on warm days and to get air.
- Spread hay over the hive as extra covering for the bees against the wind and rain—or snow if you get it.
- You might want to put up a barrier from the wind next to your bee hives but make sure the barrier won’t fall over on the bees and kill the hive or expose them to the cold.
These are the steps I took a few winters ago when the temperature was in the teens. It worked just fine against the wind, rain, and even snow. Now remember that God gave them the ability to survive the cold, but these are just extra protective measures.
Now let’s talk about how the bees survive the winter. The bees ball up in the middle of the hive with the queen in the middle and they start to shiver, making the internal temperature in the hive around 95 degrees. When the bees on the outside get cold they move to the inner layer of bees and the warmer bees move to the outside so they can shiver. The bees on the outside layer also bring honey back to the queen after their shivering session is up.
When the weather warms up they will continue their work, but when the temperatures dip again, they will ball up for warmth. Winter is also a very bad time on the bees because rodents and snakes will try to stay warm in the bee hive. That is why metal entrance reducers help keep them out. I have never had a problem with any mice or rats getting in the hives, but I suggest you take the precaution of getting the metal entrance reducer just in case.
Now, don’t get too nervous about the bees dying during the winter. Remember, they have the ability to survive, but you should still follow the instructions I have given you. These simple instructions will help you winter your hives.
The Effects of Pesticides and Herbicides on Bees

Pesticides and herbicides pose a greater threat to honeybees and other pollinators than all of the pests and diseases combined.
Neonicotinoids, insecticides that affect the nervous system of insects, are present in everyday garden herbicides and pesticides. Below is a list of products with this ingredient. One drop can kill an entire hive in a matter of hours. Farms spray hundreds of gallons of pesticides a year. Even organic farmers that use supposedly “bee-friendly” herbicides are still killing bees by poisoning them with lesser known and smaller amounts of toxin.
Neonicotinoids can be found in these products and are listed in the ingredients as Imidacloprid, Clothianidin, Thiamethoxam, Acetamiprid, or Dinotefuran:
- Bayer Advanced 3-in-1 Insect, Disease, & Mite Control
- Bayer Advanced 12 Month Tree & Shrub Insect Control
- Bayer Advanced 12 Month Tree & Shrub Protect & Feed
- Bayer Advanced Fruit, Citrus & Vegetable Insect Control
- Bayer Advanced All-in-One Rose & Flower Care concentrate
- DIY Tree Care Products Multi-Insect Killer
- Ferti-lome 2-N-1 Systemic
- Hi-Yield Systemic Insect Spray
- Knockout Ready-To-Use Grub Killer
- Monterey Once a Year Insect Control II
- Ortho Bug B Gon Year-Long Tree & Shrub Insect Control
- Ortho MAX Tree & Shrub Insect Control
- Surrender Brand GrubZ Out
- Bayer Advanced All-in-One Rose & Flower Care granules
- Green Light Grub Control with Arena
- Amdro Quick Kill Lawn & Landscape Insect Killer
- Amdro Rose & Flower Care
- Maxide Dual Action Insect Killer
- Ortho Bug B Gon Garden Insect Killer
- Ortho Bug B Gon for Lawns
- Ortho Flower, Fruit and Vegetable Insect Killer
- Ortho Rose and Flower Insect Killer
- Ortho Rose Pride Insect Killer
- Green Light Tree & Shrub Insect Control with Safari 2 G
- Safari
- Ortho Tree & Shrub Insect Control Plus Miracle Gro Plant Food
Let’s cover what happens to bees and other pollinators after they come in contact with pesticides and herbicides:
- The hive will die as a result of toxins (some within one day, others will die in less than a week.)
- The toxins could potentially enter the honey.
- If the bees don’t die, they will become sick and the hive may eventually die of other deadly diseases that come from being weak, or they might take off and find a better place to live.
The three issues above are the major contribution to the bee die-off being reported in big agricultural areas. I don’t have firsthand experience with bees dying from pesticides or herbicides since we live on ranch land, not farmland. There are many different theories as to why the bees are dying: from cell phone towers, pollution, and ozone leakage to pesticides. Most beekeepers know that the bees are dying from pesticides which weaken hives.
They are dying worldwide at an epidemic rate. A May 2014 report by Harvard states that the reason for bee die-off is neonicotinoids. They are only dying in the major fruit orchards, farm lands, and so on. Bees are actually at a stalemate and those beekeepers who are letting their bees die know the risks of bee die-off. They go through it every year because they take their bees to those orchards and let their bees pollinate the trees every season. Commercial beekeepers may have 50,000 hives and by the end of the year they are at 10,000 hives. Then they rebuild for the next year. When you hear about 800,000 bees dying that is only eight to ten hives. It isn’t a big deal; it is bad for the beekeeper, but not the whole nation.
Here are ways to look for signs of toxins in bee hives:
- The bees are a ghostly white color (which means they are sick).
- There are hundreds of dead bees at the entrances of the hive.
- They are clumsy and are climbing on the grass in front of the hive.
- Not very much brood.
- They act like zombies. They don’t have a purpose.
- The wings will be shriveled.
- The bees are deformed.
Many times a hive won’t survive these types of problems. Ninety percent of the bees in the hive will die a short time after contact with the pesticides. It is a sad reality about the use of pesticides and herbicides. Many beekeepers have to spend hundreds (and sometimes thousands) of dollars to replace hive loss caused by toxins.
I hope that this has opened your eyes to what pesticides do to honeybees and other pollinators. I am a very strong advocate of not using pesticides for the rest of your life. I use all natural insect killers like diatomaceous earth, but not around the bees, only around the house a few hundred yards away. I strongly urge you to heed my advice because I know several big beekeepers who have experienced these same issues. For those people who don’t think that pesticides are killing bees, go back and re-do your research.
Honey Bee Pests, Parasites and Diseases
Those tiny little creatures that sneak around in your hive—what are you going to do with them? In this section I am going to help you overcome your fears of pests and diseases in the hive. I will give you organic methods, including essential oils, of fighting and destroying them with extreme prejudice. Take no prisoners because your beehive and honey are on the line!
First we will start with bee pests. Here is a simple list of them and information on how to get rid of them.
Bee Pests
Varroa mites: are the vampire of the hive. They suck the bees’ blood. If you look hard enough you can see them on the thorax of the bee. They are the size of a pin head. Using a sifter, sprinkle powdered sugar over the hive and it will cause the mites to fall off the bees.
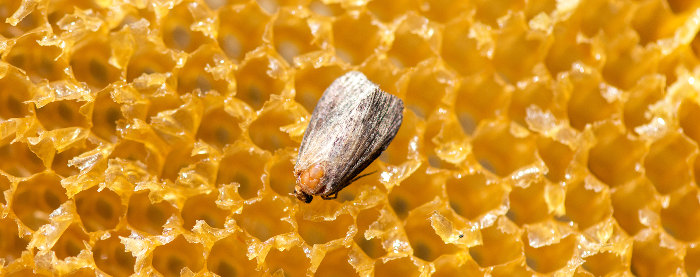
The dreaded wax moths: They lay eggs in the hive which hatch into worms and eat everything in the hive, including honey, wax, bee larva and wood. Placing some vinegar and a banana in a plastic bottle will attract the wax moths. I also squish the larva if I see them. If your boxes are infected and there are no bees in them you can smoke the wax moths.
Light a fire in a BBQ pit or smoker. When the flames die down (make sure that it is really hot inside) put your hive bodies and frames in there. Watch them to make sure they don’t catch on fire. When the frames and boxes heat up, the wax moth larva will come out of the holes they burrow into and will die from the heat and smoke in the pit. Take out the pest-free box and continue to the next until all the equipment is clean.
Tracheal mites: These parasites get inside the bees’ lungs in the abdomen and clog them. Eventually there will be too many in the lungs and the bee will suffocate. I know of nothing to treat tracheal mites organically, but there are other means of helping the bees that use chemicals.
Hive beetles: These pests live inside the hive. They eat the larva of the bees and the wax. They are very tiny black beetles. Kill them on sight. They usually run and hide in corners of the frames, the inner cover or in the honeycomb. You can use a beetle trap to kill the hive beetles, too. Fill the black trap with vegetable oil and then put the trap in between the frames. The beetles will run into the trap and drown. Empty the trap and refill it when you’re inspecting the hive.
Ants: They do not pose a huge problem; just put diatomaceous earth (DE) around the hive. You’ll need to replenish the DE after a rain.
Bee Diseases
Now we move to the bee diseases. These diseases I am about to list scare any beekeeper, but when you are armed with information, you will conquer them before they have time to spread. Do not fear, for knowledge is coming!
American Foul Brood (AFB): This disease attacks the brood of the hive. You will know when you have it because of the awful smell in the hive. The frames will be slimy and the larva and pupae will be a dark color instead of pearly white. There is no organic treatment. In fact, you must burn the hive to keep it from spreading to your other hives. Use extreme caution when burning the hive.
European Foul Brood (EFB): This produces a foul odor in the hive, like AFB, only not as strong. The cells on the frames look sunken and the larva are twisted on the bottom of the cell. They look like a cork screw (ouch). The larvae are also light brown in color. There is also no organic treatment; you must burn the hive (Nooooooo!).
Nosema: This disease is more likely to occur in the spring. Colonies grow slowly or not at all. The bees shiver violently and crawl around in crazy patterns. The hive is also covered in brown mustard-looking gunk (bee feces). Move the hives to an area with good air flow and ventilation until the condition goes away.
Chalkbrood: This disease attacks the brood and basically turns them into mummies. There is no treatment for this disease. It simply has to run its course. The hive will not die but should recover over time. You will see chalk-like brood at the entrance of the hive where the bees have dumped the remains of other dead bees.
Sacbrood: Sacbrood is a viral disease that gets inside the larva and kills them. They almost appear like a water-filled sack. There is no treatment for the hive, but it is not considered a major threat either. The quickest way to get rid of the disease is to pull the infected brood out of the frame with a toothpick or tweezers.
Stonebrood: This is a rare fungal disease that attacks larvae and pupae. The way to prevent this is to keep your bees from a stressful situation (i.e. other pests and diseases).
I wish that you never have to go through any of these problems, but being prepared with knowledge on how to deal with bee diseases and pests should help you succeed if you ever have to face that battle.
I hope this how to start a beehive guide has helped you on your beekeeping journey! Your bees should be happy and healthy, producing lots of wax, honey, and propolis. Each up and down that you experience with your beehives will make you a better beekeeper. You can always learn more about dealing with bees through your local beekeepers’ association, getting a veteran beekeeper to mentor you, books and DVDs, and of course, hands-on experience.
 Bubbas (aka James Duke) started his journey as a beekeeper at the age of 11. Now at the age of 15 Bubba has made his hobby into a full-blown business. He hopes to never have a normal job unless forced to.
Thank you, I enjoyed to read this. Will try to start with this journey. If I want to start slowly due to funds…what will the best way be?