


If you have ever been in a situation where you were called upon to speak in public and discovered that there was no lectern or podium for your notes, you will easily be able to see the value of the project that I will be sharing today. I will be demonstrating how to make a DIY lectern from cardboard that can be sized according to your individual needs—especially useful if you are at either end of the height spectrum!
There are good portable lecterns you can buy for about $50 and these are great for collapsing and putting in your car. For example, this adjustable and portable lectern weighs about 10 pounds and is something you can take with you to your event. You can travel with your portable podium or you can go with a larger nice looking podium but these cost over $100. Therefore, why not build your own lectern out of cardboard? I usually have a cardboard box laying around. The box costs me nothing for my DIY podium project and it’s a much better use than throwing it away.
Teachers may find this DIY podium project useful, as would beginning speech or debate groups. This DIY project is also excellent for beginning shop students. It allows them to learn about construction and design before turning loose with power tools!
How to Make a Cardboard Lectern – Step by Step
Supplies You Will Need:
- Thick, sturdy cardboard preferably double-corrugated
- Tacky glue
- Scissors or a box cutter
- Ruler
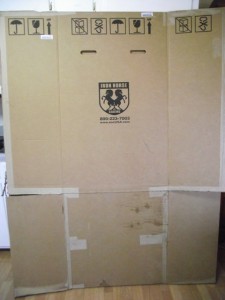
You may already have some cardboard on hand if you save it like I do, but if not, some furniture stores are more than happy to give away large boxes. You simply need to ask. My brother-in-law kindly saved this box for me when a large chair was sent to his workplace.
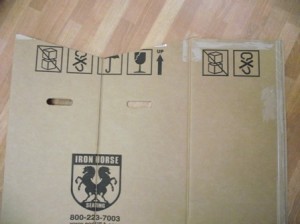
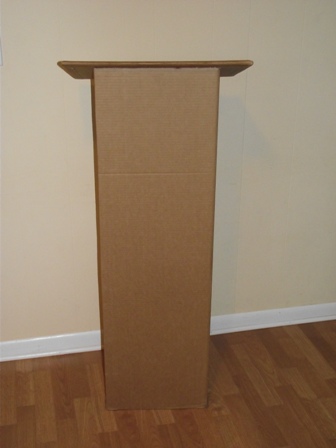
The design I had in mind for this cardboard lecturn was to have the base form a triangular column that I would angle at the top and to which I would add a flat surface for books and papers. I am sure there are simpler designs possible, so read through my instructions before you start and make changes as you desire. The box my brother-in-law saved for me was tall enough that I did not have to do any piecing together. I was able to cut the front panel from the box along with one of the side flaps. I really could not think of an easy way to conceal the openings in the front of the box, so I incorporated them into my design.
Score & Mark
I decided the side flap would be the front of my lectern and what was currently the front of the box would form the two back pieces of my base column. This would mean that in the finished lectern, the openings in the box would be in the back and would provide a place for holding it when it needed to be moved.
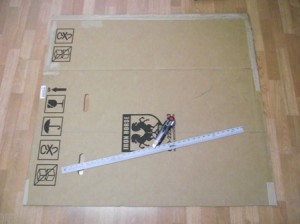
To that end, I centered and lightly scored (not all the way through!) a line from top to bottom on the front section of the box. I made sure to put all marks and score lines on the printed side of the box so that I could fold the printing to the inside of the lectern and the plain side would be what was visible.
Fold
Then I carefully folded the box along the scored line so that the printed sides would be touching. Each of the two halves that I had created with my fold was now not as wide as the side flap which I wanted to serve as the front of my lectern.

After I opened the box back out flat, I was able to measure and cut what would form the slant for the top. To do this, I came down three inches from the top of the box along the center fold line and made a mark. (A three-inch drop from the top gives a fairly pronounced angle on the finished lectern top. If you like a flatter surface, I would recommend staying closer to two inches.)
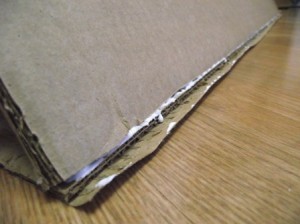
From this mark, I drew lines back up to the sides. I cut and removed the triangular-shaped cardboard above the lines I had drawn. In order to provide an attractive way to cover the seam where the column would be glued together, I also scored a line about three-quarters of an inch from the long free edge of the flap section that was now to be the front of the lectern, making sure not to go all the way through.
I removed the back “skin” and the corrugation from this strip, leaving only the front piece of cardboard in place. This extending piece of cardboard would be used to cover the place where the raw edges of the column join together. At this point, I stood the cardboard up and checked to see if the height was appropriate in case I needed to shorten it by cutting excess length from the bottom. (It can still be shortened later, but it is easier to do while the box is still flat.)

Glue

With all the cutting completed on the base, I began the task of gluing it together.
I used tacky glue on this project, but other crafting glues would be fine. I applied a line of glue along the long edge of the flap and brought the free edge of the other side of my box to rest on the glue. This formed the triangular-shaped column I desired. This step was a little tricky because there was not an easy way to keep the edges together. I ended up having to hold it in place for several minutes while the glue set.
As soon as I could, I added another line of glue along the edge and covered the raw edges with the overlap from the front piece of the box.
Make the Top of your DIY Lectern
While the glue continued drying on the base, I turned my attention to the top of the lectern that would eventually be the surface that would hold the speaker’s books and papers. This surface needed to be stiff and sturdy, so I cut another flap from the box, folded it in half and cut it down to the size I wanted the top to be. I glued the two pieces together to further strengthen them. To present a more polished look, I knew that I would have to cover the raw edges of the top so that the corrugation would not show.
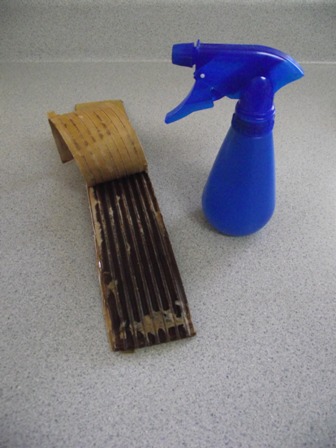
To do this, I cut more strips of cardboard about three inches wide and long enough to fit the length of the side I was covering. (I find this step easier to accomplish if I cut with the “grain” of the corrugation and not against it.) I used a spray bottle to moisten the corrugated sections between the cardboard “skins” on either side.
After a minute, the glue on the corrugation softened enough that it separated easily. I removed the corrugation and used the remaining cardboard strips to cover the raw edges on the top by gluing them in place. I covered the top and the two sides, but I did not do the bottom edge because I needed to make the book-rest at the bottom before I covered that edge.

To create an edge that would keep the books or other materials from falling off the lectern top, I cut two more strips of cardboard to go along its bottom edge and glued them together. The width of this book rest is up to personal preference, but it should be the same length as the piece designed to be the top of the lectern.
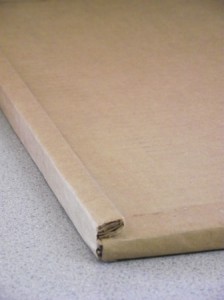
I cut another strip of cardboard wide enough to wrap around my rest and also cover the final side of exposed raw edges on the lectern top. Once again I removed the center corrugation and used the resulting “skin.” By gluing the cover strip to the bottom edge of one side of the rest, I was able to turn the rest over and glue that side down onto the lower edge of the top in a way that allowed me to wrap the rest of the cover down over the last remaining exposed edge of the top. (Please see the photo for details.)

Join Your Two Pieces Together
With the top and bottom pieces complete, the remaining step was to join the two together. I could have just glued the two pieces together as they were, but I was concerned that any real weight that was placed on the top might cause the pieces to separate. So I set about to make the connection more secure.
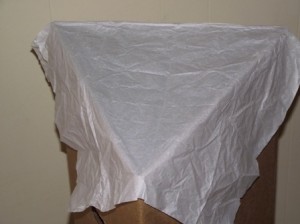
My plan was to add two triangular-shaped pieces to the top that would fit inside the base. For this, I needed to make a pattern of the inside triangle shape of the lectern base. I achieved this by draping a used piece of tissue paper over the top of the base and creasing a line along the inside edges of the opening in the base. I then cut along the creased lines and use the paper triangle to trace two more same-sized triangles of cardboard. I cut those out and glued them together.
Centering the cardboard triangle on the underside of the lectern top and making sure the point of the triangle was oriented in the correct direction, I glued it in place.
Once that glue was dry, I put more glue on the sides of the triangle and along the top edges of the base and pressed the top down into place. A moderate-sized book placed on top kept the two pieces pressed together until the glue had set and dried.
DIY Lectern – Final Product
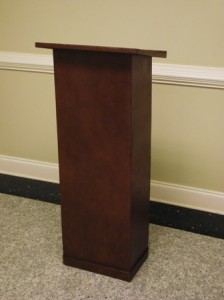
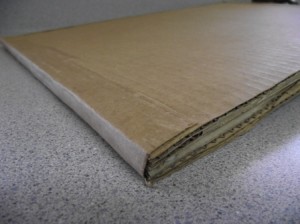
As can be seen in the photo of the finished lectern, it looks very much like a standard lectern from the front.
DIY Podium Paint
Though I did not paint this particular DIY podium (I left the finishing choices up to the recipient), the second photo shows a standard-style (much more involved!) cardboard lectern I made that I did cover in a coat of thinned acrylic paint which I rubbed on with a cloth. The paint by itself was flat and dusty-looking, but the idea came to me to see what a coat of Old English scratch cover would do, and I was amazed at the depth and beauty it added to the finished look of the lectern! It handsomely disguised the cardboard in a remarkable way!
I find it difficult to be working on a project that centers so much on teaching and learning without being reminded of the promise of God in Psalm 32:8 “I will instruct thee and teach thee in the way which thou shalt go: I will guide thee with mine eye.”
Since we live in a world full of difficult choices and the future is hidden from us, it is comforting to know that the God Who has all wisdom, knowledge, and understanding has promised to teach and guide us. I am learning more and more just how much I need to learn and how perfect the Word and the Teacher are!
Sharon White is a pastor’s wife and homeschooling mother of three living in Georgia. To see more of her work, go to http://newlifenewpurpose.wordpress.com/.