By Kristi Cook
At summer’s end, garden tools and seeds are stored away as farmers go inside to wait out the cold days of winter. However, you don’t have to tuck away your garden just yet. Instead, learn how to extend growing season and switch to a winter garden filled with lush, succulent greens, crisp radishes, and candy sweet carrots. All you need are seeds, a bit of planning, and a simple box or low tunnel. Although, another gardening option is to use an indoor hydroponic gardening system, which is discussed in a separate article on this site.
What Grows In the Cold?
To learn how to extend growing season, we need to know what types of vegetables will realistically survive and thrive in the cold. And that answer is nothing, really. Instead of trying to grow veggies in the cold, winter gardening takes traditional spring and fall crops, such as spinach and kale, and grows them to harvest size during late summer and early fall. Once temps start dipping towards that first killer frost, you add cold protection with cold frames or low tunnels so plants can be harvested throughout the colder months.
As an added bonus, the cut-and-come-again crops often reestablish themselves extra early in spring, providing another burst of enticing meals.
Vegetables for Extended Growing Season
Candidates for the winter garden must be cold-resistant and able to withstand cool, moist soil, so don’t bother with heat-loving veggies such as squash, watermelon, or tomatoes. Instead, select varieties of
- Lettuce
- Spinach
- Turnips
- Corn salad
- Beets
- Mustard greens
- Scallions
- Swiss chard
- Other cool season crops
The way to remember what to select is simple: just pay attention to what grows in spring and is short enough to fit in a cold frame or low tunnel (approximately 12”-18” tall).
Winter Seed Supplies
As you begin your journey into winter gardening, keep in mind most garden centers put away seed supplies by midsummer. If you wait until later to make winter selections—as many of us do—you will likely need to seek online sources or a local mom-and-pop store. They always seem to have a few of spring’s leftover seeds tucked behind the counter. Because I know that my area does away with seeds extra early, I try to purchase enough packets for the fall planting, when I make my spring selections.
While this haphazard method sometimes leaves a few gaps in my needs and often provides me with packets I never use, it is usually less expensive and easier than rounding up seeds during the busy time of harvesting and putting away summer vegetables.
Get the Garden Growing!
Finding out how to extend growing season is all in proper timing. Yet, because hardiness zones and individual garden sites contain different climates and microclimates, the exact timing of planting will be a bit of trial and error. The method I use in my Zone 7 garden any time I plant a new fall/winter crop is simple. Just add the seed packet’s expected germination time and days to harvest together. Then, calculate backward from your first frost date to get the date for the first sowing. Each week for at least a month, sow a small row to get an idea of what works best for germination and quality of harvest for each cultivar you choose. As you make notes, jot down weather conditions, as well, since this dramatically affects the results.
Unlike in the summer garden, this form of succession planting is not intended to provide a maturing harvest supply over multiple weeks since winter crops basically stop growth once shorter days hit. Rather, it’s purpose is to help you determine what stage you prefer each veggie to be at once they go into this winter holding phase. Then, because plants are more or less hibernating, you can harvest all through winter–or until it gets too cold for that particular crop despite added protection. It will also give you an idea as to how much and how long of a harvest you can expect. As with any gardening, you will develop a sense of timing for your particular needs.
Cold Frame or Low Tunnel?
To extend growing season, winter gardens need protection when the temperature plunges. However, the goal is not to create summer-like conditions. Instead, cold frames and low tunnels limit freeze/thaw cycles by collecting solar heat, blocking chilling winds, and avoiding soaking rains. Temperatures inside both options often stay 10°-20°F above outside temperatures (a little less on cloudy days), depending on materials used. When temps drop into the low teens or single digits, adding an extra layer of insulation is often all that’s needed to avoid freezing plants. As with all things, however, each method of winter protection has its pros and cons.
Extending Your Growing Season with Cold Frames
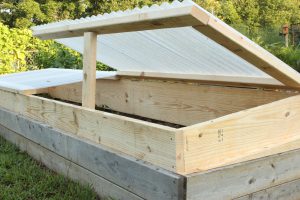
Cold frames are simple, bottomless boxes no higher than 12” or so in the back and approximately 8” high in front (there’s no hard and fast rule on height, but try to keep it on the lower side to retain heat). Some type of translucent material is needed to function as a lid. Use what’s on hand to keep costs down, such as untreated lumber, bricks, masonry blocks, hay bales, or even river rock. Recycle old storm doors or windows, shower doors, salvaged greenhouse panels, Lexan, or other clear material for the light (or lid) to further increase savings.
Cold Frame Benefits
Of the two options, cold frames offer the best stability during heavy wind, snow or rain provided the light is securely closed. Adding extra insulation is a simple matter of placing a heavy blanket or several inches of hay across the top and sides. This will stay in place unless heavy winds are present. Venting excess heat can be automated with temperature activated vent openers or performed manually.
Once warm weather arrives, you can either move the entire frame to a new location, leave it empty for the summer, or simply remove the light and continue using the box as a garden bed. When using long lasting materials like new wood or rock, a box can last for years.
Downsides to Using Cold Frames
The downside to cold frames is primarily cost when used/salvaged materials are not available since new materials can be pricey (but again, it should last for several years). Also, if you build your box large, you will likely need help moving it to different locations. Windy days can be a problem, too when the lid is raised for venting since you could be faced with the added expense of replacing a wind-torn light. Finally, should you realize you need more height or width, you have no recourse but to build another box unless your design allows for expansion.
Extend Vegetable Garden Growing Seasons with Low Tunnels
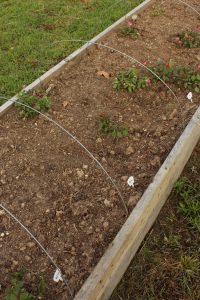
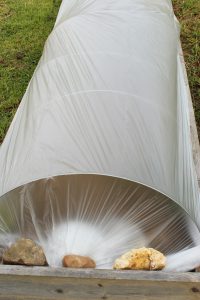
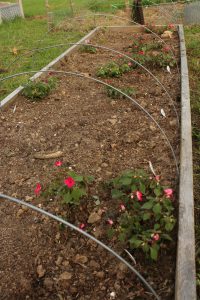
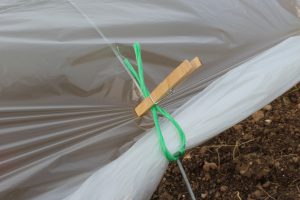
Low tunnels, on the other hand, are inherently inexpensive as there are few materials required. Translucent plastic sheeting and PVC pipe, rebar, or 9-gauge wire are all that’s needed. To add insulation, simply add more layers or select thicker plastic. Relocating tunnels is no problem, either. Just roll up the cover, pull up the wire/PVC/rebar, and move to a new spot.
When not needed, store out of the way in an attic or shed. Dimensions can easily and inexpensively by altered by adjusting the length/height of framing material. During light snows and even freezing rain, the domed shape helps minimize buildup, too.
Downsides to Low Tunnels for Vegetable Winter Protection
As with cold frames, low tunnels have their own negatives. While lightweight construction allows for ease of relocation, it also makes it easier for heavy winds to blow coverings loose. And to keep heat in and reduce wind damage to the structure, all edges must be either buried in dirt, weighted down with smooth rocks or sandbags, or pinned to the ground. This, in turn, must be undone/redone every time you harvest veggies or need to vent excess heat. Last, but not least, if you go with the more inexpensive plastic coverings common in home supply stores, you’ll likely only get a single season’s use. Sturdier commercial varieties are readily available and should last several seasons; however, they are more expensive.
Regardless of which type of winter protection you select, be sure to look around online, in books, and in neighbors’ gardens at the myriad versions available before deciding on a specific style. As your garden changes, you can always modify or altogether change what you utilize each season.
Don’t Overheat Your Garden
While you want to keep heat in, there will be times when you have to let excess heat escape by ventilating the box or tunnel. Keep a thermometer in the center and monitor throughout the day until you get the feel of when to vent. In most cases, outside temperatures of 40°F and higher require venting for at least part of the day. At the cooler end, you may need to lift the light/tunnel only a few inches. Warmer weather will call for wider openings. Just be sure to monitor temps closely, particularly if a chilling wind is blowing. Make sure to close all openings before nightfall to avoid frost.
Limit Watering
Watering cold frames and tunnels will occasionally be needed. Fluctuating temperatures of late fall and early spring demand vigilant attention to moisture levels, as evaporation rates will vary dramatically from day to day. During the coldest months, however, little to no additional water will be necessary since moisture loss will be at a minimum. As with any garden, keep a close watch throughout the season. Cool, damp soil is all these plants need.
Don’t be Afraid to Experiment
Each climate allows for slightly different gardening choices, whether it’s cultivars grown or methods used. Therefore, experimentation is key. It’s not only fun, it’s how we learn what our gardens can produce. Expect a few failures along the way; however, it only takes a bit of experience before you’re an old pro. Learning how to extend growing season will allow your family to reap the benefits of fresh veggies deeper into the fall.
Kristi Cook’s family has been discovering the joys of sustainable living for many years, increasing self-sufficiency with each passing season. One of Kristi’s greatest pleasures is sharing lessons learned along the way with others.


