


By Melinda Martin
As the manager of an online store, the most important tasks should be: creating a superior product; providing excellent customer service, and taking great photos of your product. Most of us invest our money into the actual product (item 1), and our time is split up between creating our product and fulfilling and shipping orders (item 2), leaving very little funds and energy for investing into our product photography (item 3).
You may think that you don’t have the skill or finances to create great photos, but I want to give you five product photography essentials that you can build on.

- Make sure the focus is on your product. Yes, sometimes props will add necessary character and size reference to your product. Just make sure that the photo doesn’t morph into a picture of your grandma’s curio cabinet selections. By all means, use a backdrop to enhance your chances of catching a potential customer’s eye. But do not allow the backdrop to overpower your image. It should complement it.
- Take care that your product is accurately represented. Today’s online store venues allow for multiple images per product for thorough product representation. Capture your product at various angles and capture the different sides of your product. To me, knowing what the back of the product I’m ordering looks like is just as important as seeing the front. Before I buy a product, I want to see it from all angles and I want to see details. If the craftsmanship falls off in the parts that are normally hidden from view, then that sends up warning bells for me as a buyer.
I have even seen some great photos that are just of the supplies used to make the product. This makes a great connection to the “This is handmade” mentality of our customers. They WANT handmade. They have sought you out online instead of settling for the knock off version at supermarkets. Do your best to portray exactly what they will be receiving.
- Include more clean background space than you think will need. A properly cropped photo is a must. As you grow in your product photography skills, you will learn about balance and proportion. If you don’t have a good foundation photo to start with, then you will never achieve professional results. You will also need to ensure that there is plenty of natural room for any text to be placed.
- Good photo editing software will be your best friend. Many moons ago, I started out with some program I got for free with my PC. I am now very handy with Photoshop, which is a very powerful program that was made just for this task. Several of my friends in the blogging community are avid PicMonkey users, which is a free online resource. Thankfully, today’s technology puts achieving quality product photos within the reach of our budgets and our fingertips. You can even download photo editing software to your phone or tablet, giving you a compact, (sometimes) inexpensive, and mobile photography station.
Regardless of which path you choose, make sure it includes these two must-haves (and I also threw in a really handy bonus feature):
• Image rotation adjustment. Sometimes, you will just need to nudge that image by 1 degree to achieve that perfect balance.
• Light balancing. Often, just a simple click on an “auto adjust” feature will bring up your lighting to the right place.
• The ability to use layers and opacity settings. The opacity adjustment will prevent your photo from looking too chunky. The layering ability is just fabulous for all sorts of things. With layers, you don’t have to mark up your original photo. The layers just lay on top of it, allowing you to move them around as you see fit.
- And my last tip is always take more than one shot. Even taking more than one shot at the same exact angle is suggested, because—especially for beginners—your eyes may not be as perceptive to a natural lighting shift. A little trick that I have is I set my product display up on a lazy susan. I will turn the lazy susan so that I can get just the right amount/placement of shadow/light. It’s a big rectangular one that I lucked into at a thrift shop. Finders keepers!
By following these five product photography essentials, I was able to take the photo on the left (my “before”) and help it blossom into the photo on the right. It required roughly 10 minutes of my time. Well worth it.
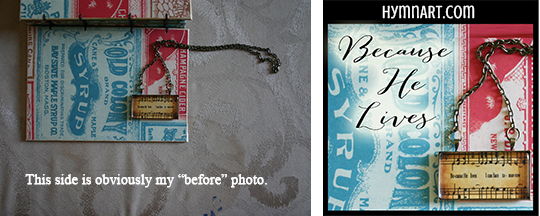
The good news is that you don’t have to have an expensive camera or editing software to achieve these same results. I used my stained piano bench and a handmade journal that I received as a gift. My sister gave me her 10-year-old camera. You can do a lot with very little. As with all things in life, just take your time, do your research, experiment, and continuously look for ways to improve your work.
If product photography ends up being something that you just cannot master, then find a budding photographer to do it for you for either a small fee or for exchange of your product. No one said that you have to do everything yourself. But that’s material for a future article.
Melinda Martin is the owner of The Helpy Helper, where she offers independent publishing services and graphic design. However, her first love has always been writing, and she still finds time to contribute to the blogosphere at Musings of a Ministers Wife, home of the hymn art necklace.